Querying a Database with LINQ to SQL
We will be creating a Windows Forms Application that allows you to query and view records from a particular table using LINQ to SQL classes, SQL Server 2008, and the Northwind sample database. In this topic, we will learn how to use the Object Relational Designer to generate LINQ to SQL Classes and how to use them in your code.
Creating LINQ to SQL Classes
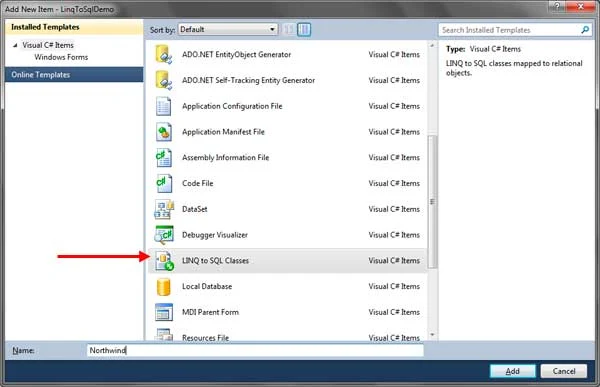
Create a replacement Windows Forms Application and name it Linqdemo. Once a project is made, we'd like to feature a LINQ to SQL file. Click the Add New Item button within the toolbar and find LINQ to SQL Classes from the list of templates. Name it Northwind and click the Add button
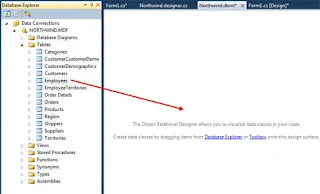
- Go to Views > Other Windows > Database Explorer.
- Open the Database Explorer window and click the Connect to Database icon.
We will be presented with the Choose Data Source Dialog which asks which type of data source to use for the connection. and Choose SQL Server Database File. Checking the checkbox allows you to always choose the specified type of data source when you want to add another one.
We will be presented by another window asking for the type of data source and the location of the database files. You can also specify which SQL Server account to use but if you are using an administrator windows user account, then you can simply leave the default option. You can also click the Advanced button to edit more advanced settings about the connection.
Click the Browse button and browse for the Northwind.MDF file. If you have installed it and it will be located at C:\SQL Server 2000 Sample Databases. Choose the file and click Open. Be sure that the file is not used by other programs. We then need to test the connection. Click the Test Connection button and if everything is working properly, you will receive the following message.
The Northwind.mdf will now appear as a child node of the Data Connections in the Database Explorer window. Expand the Northwind.MDF node to be presented with folders representing the different components of the database. Expand the Tables folder to see the different Tables of the Northwind database. We need to drag tables from the Database Explorer window to the Object Relational Designer's surface. drag the Employees table to the Object Relational Designer.
Visual Studio will prompt you whether to copy the Northwind.MDF database file since it will detect that it is located outside your project folder. Clicking Yes will copy the Northwind.MDF file from the original location to your project folder. Also note that every time you run your program, the database file will also be copied to the output directory.
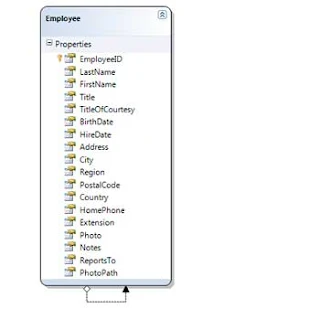
After clicking Yes, The Object Relational Designer will now show a class diagram representing a generated class that will hold values of each row in the Employees table. The name of the class is a singularized version of the Table's name. The property with an appropriate type is created for every column in the dragged table. You will see these properties in the Object Relational Designer. If a property conflict with the name of the class, then it will be numbered. For example, if the class's name is Employee and it has a column named Employee as well, then the column's corresponding property will be named Employee1.
As soon as you drag a table to the Object Relational Designer, the DataContext class for the corresponding database will be created. the generated DataContext class will be named NorthwindDataContext. Clicking a blank space in the Object Relational Designer will allow you to edit the properties of the DataContext class using the Properties Window. You can also change the properties of the created row class and the properties of its members.
If you are curious about the generated classes and want to take a look at its implementation, go to Solution Explorer and expand the node for the created DBML file. You will be presented with two files. Double click the one with .designer.cs extension. You will then see how the classes for your tables and DataContext was defined. You should always save the DBML file before using it in your application.


Personally I think overjoyed I discovered the blogs.Small Business ERP Software
ReplyDelete